Common Missteps in DIY Pressure Washing and How to Avoid Them
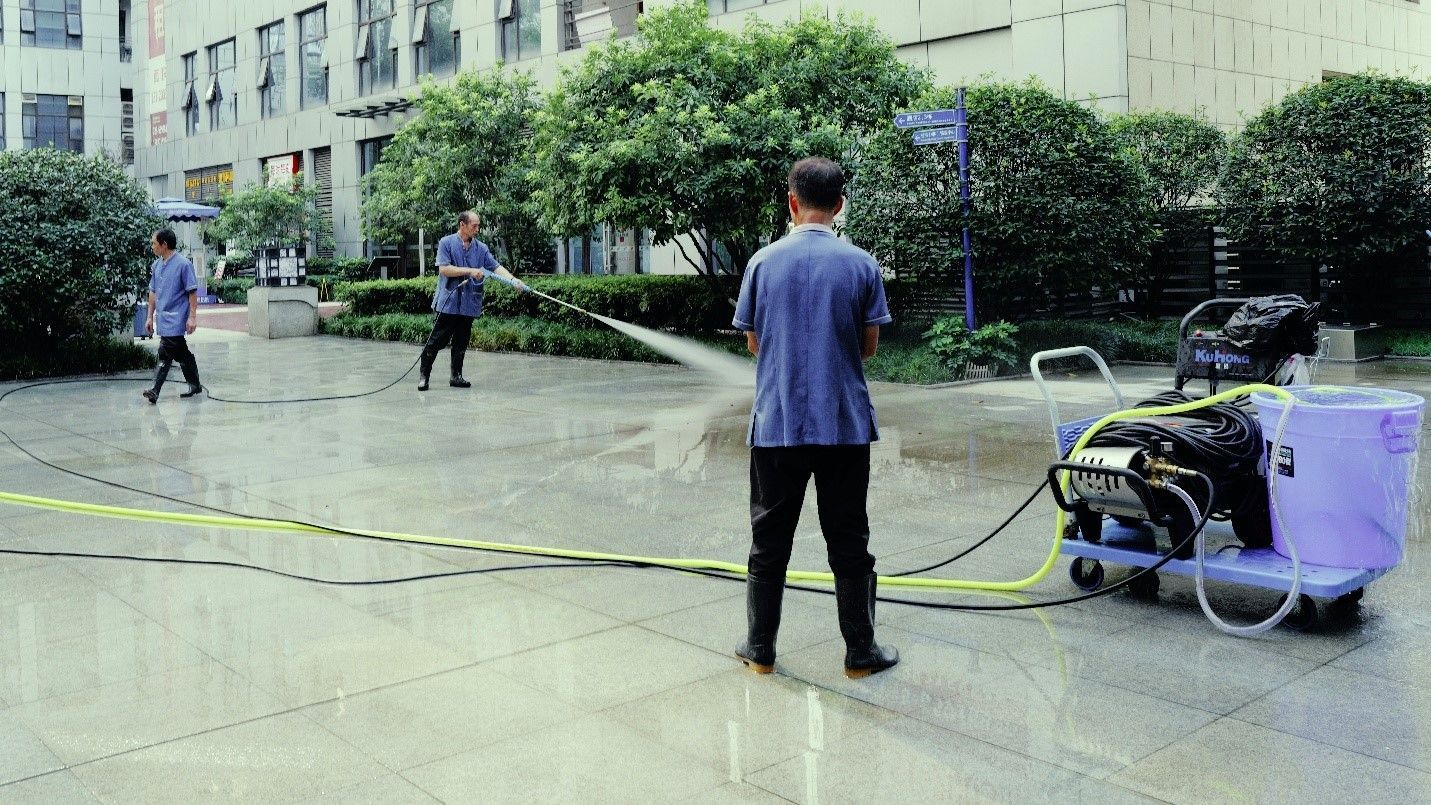
Pressure washing can seem like a straightforward task. Hook up the machine, spray away the grime, and enjoy the sparkling results. However, what many homeowners don’t realize is how easy it is to cause damage or waste time with ineffective techniques. A few wrong moves with that powerful stream of water can lead to stripped paint, gouged wood, cracked siding, or worse.
If you’re planning to take on this chore yourself, it’s worth learning about common DIY pressure washing mistakes and, more importantly, how to steer clear of them. With the right approach and a bit of Clear Wave expert advice, you can get the job done safely and effectively.
The Allure and the Risks of DIY Pressure Washing
It’s easy to see why people attempt pressure washing themselves. Rental machines are affordable, and there’s satisfaction in seeing layers of dirt wash away in seconds. Well, pressure washers aren’t ordinary tools. They can pack up to 3,000 PSI (pounds per square inch), enough to carve into wood, dent soft metals, or shatter glass.
That’s why knowing what not to do is just as important as knowing the right technique. Let’s break down some of the most common mistakes and how to avoid them.
Mistake 1: Using Too Much Pressure
One of the most frequent DIY pressure washing mistakes is assuming that more power means a better clean. Cranking up the pressure might remove grime quickly, but it can also rip up siding, pit concrete, or etch brick.
Better approach? Use the lowest pressure that gets the job done. For softer surfaces like wood or vinyl siding, start with a wide spray angle and adjust only if necessary. Testing on a small, hidden spot first is always smart.
Mistake 2: Holding the Nozzle Too Close
It’s tempting to get right up close to a stubborn stain, but this can cause permanent damage. Holding the nozzle just a few inches from the surface can strip paint, tear window screens, or splinter wood.
Pressure washing tip: Stay at least 12 to 18 inches away to start. Gradually move closer only if the dirt isn’t budging, and even then, be cautious. Think of it as sweeping the dirt away rather than attacking it.
Mistake 3: Skipping Safety Gear
Another common error is assuming that because you’re just “washing,” you don’t need protection. Well, high-pressure water can bounce back unexpectedly, and the cleaning solutions used can be harsh on skin and eyes.
Clear Wave expert advice:
Wear sturdy shoes, eye protection, and gloves. Be mindful of slippery surfaces after spraying. It’s easy to lose your footing
Mistake 4: Using the Wrong Cleaning Solution
Water alone often isn’t enough to break down mildew, algae, or greasy stains, but using the wrong detergent or applying it incorrectly can damage surfaces or harm plants and pets.
What works better? Choose a cleaner made for your specific material, whether it’s siding, decking, or stone. Apply from the bottom up to prevent streaks, and let it sit briefly so it can do its work before rinsing.
Mistake 5: Neglecting Nearby Areas
When you’re focused on blasting away grime, it’s easy to forget what’s nearby. Delicate landscaping, outdoor furniture, light fixtures, and even neighbors’ property can be in the line of fire.
Here’s a pressure washing tip! Take a few minutes to move or cover items you want to protect. Pay attention to where runoff will go so you’re not creating muddy messes or chemical puddles.
Mistake 6: Overlooking the Weather
You might not think the weather matters much when washing your exterior, but it can make or break your results. Wind can send spray where you don’t want it, and washing on a blazing hot day can cause detergents to dry too fast, leaving streaks or residue.
Better timing? Aim for a calm, overcast day or work during the cooler hours of morning or late afternoon.
Mistake 7: Ignoring the Power of Soft Washing
Many people don’t realize that soft washing is often the better option for roofs, siding, and other delicate areas. By relying on low pressure and cleaning solutions, soft washing cleans thoroughly without the risk of damage that high pressure brings.
Clear Wave expert advice: Reserve high-pressure washing for hard surfaces like concrete or stone. For most home exteriors, soft washing delivers a safe and long-lasting clean.
Bonus: Safe Pressure Ranges for Common Surfaces
| Surface | Pressure Level | Suitable For |
|---|---|---|
| Wood deck | 500–1,200 | Use wide spray pattern |
| Vinyl siding | 1,300–1,600 | Avoid direct spray at seams |
| Concrete driveway | 2,500–3,000 | Test small area before starting |
| Roof shingles | Soft wash (under 500 PSI) | High pressure can cause damage |
How to Set Yourself Up for Success?
Getting pressure washing right is about preparation as much as execution. Here are four simple steps to follow.
Step 1: Walk Your Property Like a Pro
First things first, take a slow walk around your home and look at everything with fresh eyes. Pay attention to materials. Is that siding wood or vinyl? Are there any hairline cracks in the concrete you never noticed before? Make note of fragile items like outdoor lights, mailboxes, or garden statues that could be knocked loose by the spray.
Don’t forget about your plants and lawn. Anything within reach of runoff or overspray might need covering or moving. This simple step helps you spot potential trouble zones and plan your approach with confidence.
Step 2: Start with a Small Test Patch
No matter how confident you feel, it’s always smart to test your settings before tackling large areas. Choose a spot that’s out of sight, such as behind a bush, down by the foundation, or near the back corner of the deck. Spray for a few seconds and see how the surface reacts.
Are you lifting dirt without stripping paint? Is the spray spreading evenly, or is it gouging? Taking this moment upfront can save you from discovering halfway through that the pressure is too high or the angle isn’t working. Think of it as your chance to fine-tune before going big.
Step 3: Work in Manageable Sections
It’s tempting to try to cover large areas as quickly as possible, but pressure washing rewards patience. Divide your project into smaller zones, maybe one wall of siding at a time, or a few feet of driveway.
This makes it easier to control your results and keeps you from missing spots. After washing a section, take a moment to rinse it thoroughly to prevent residue or streaking. Working this way helps you spot any areas that need a second pass while everything’s still wet and easy to clean.
Step 4: Keep an Eye on Water Flow and Runoff
As you work, it’s easy to focus only on what’s right in front of the nozzle, but pay attention to where your water, soap, and debris are ending up. If you notice water pooling in a low spot, stop and guide it away before it becomes a slipping hazard. Watch how the runoff moves. Is it flooding a flower bed or heading toward a basement window well? Staying aware of this helps you protect your home and yard while keeping the work area safer to move around. It also means less cleanup when you’re done.
The Value of Knowing When to Call a Pro
There’s pride in DIY, but it’s also important to know when to hand the job off. If you’re dealing with tall areas, stubborn stains, or delicate surfaces, a professional service can save you time, stress, and potential repair costs.
So, for a job like this, Clear Wave expert advice means trained eyes spotting problem areas before they become costly repairs. Their teams use the right equipment and techniques for each surface, so you don’t have to worry about accidental damage or incomplete results.
Key Signs You May Need Help
Apart from tall areas, stubborn stains, or delicate surfaces, how can you tell when it’s best to bring in a pro rather than tackling it yourself? Watch for:
- Surfaces that are high or hard to reach safely
- Areas with significant mold or mildew buildup
- Surfaces like roofs or painted siding that could be damaged by high pressure
- Large jobs where time and equipment may be a limiting factor
A Smarter, Safer Way to Pressure Wash
Wrapping it up, DIY pressure washing can be rewarding when done right. So, before you fire up that pressure washer, take a moment to review your plan. With these practical pressure washing tips and a focus on avoiding DIY pressure washing mistakes, you can refresh your home’s exterior without unintended damage.
And if you’d rather have peace of mind from the start, a Clear Wave team is ready to help, delivering great results with no hassle.
Dial (805) 203-0345 and get in touch with Clear Wave to protect your home, your landscaping, and yourself.
For more insights, check out our related
blogs.